
ArXiv Dives: Efficient DiT Fine-Tuning with PixART for Text to Image Generation

Diffusion Transformers have been gaining a lot of steam since OpenAI's demo of Sora back in March. The problem, when we think of training text-to-image models, we usually think millions of GPU hours. This gets expensive fast, and hinders the communities ability to innovate.
PixArt-α offers a solution with its introduction of an efficient Diffusion Transformer based Text2Image diffusion model that’s quality is competitive with state-of-the-art image generators with a low training cost.
In this blog, we are going to show you how to take a base PixArt model and fine-tune it further to a specific style using Parameter Efficient Fine-Tuning (PEFT) with LoRA. We will first explain the paper and model architecture, then show how we fine-tuned it on three different styles including the Lego City Adventures, The Simpsons, and Wes Anderson's Asteroid City to see how well this technique works in practice on a single A10 GPU.
So, How Much Faster?
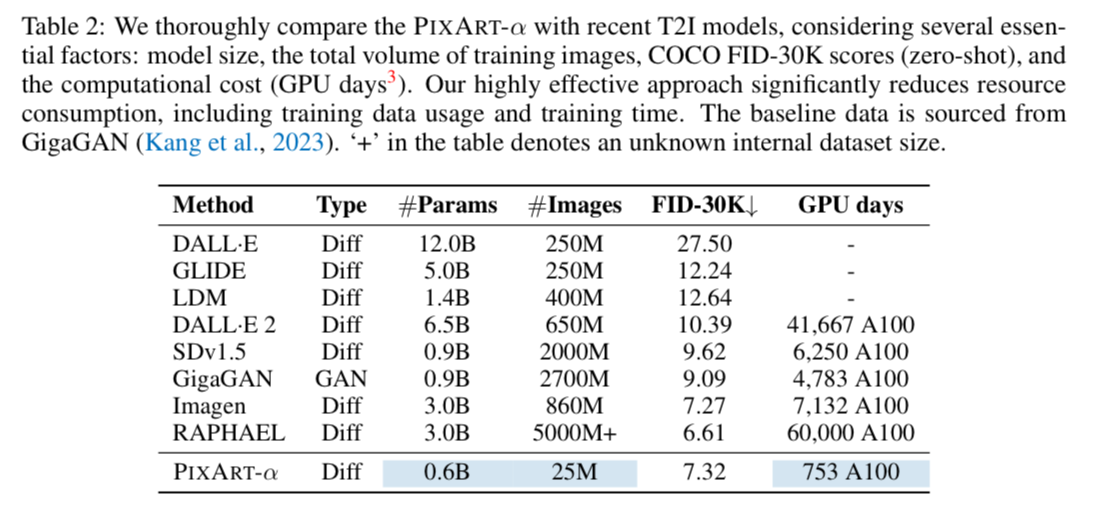
For reference, Stable Diffusion takes 6,000 A100 GPU days. This costs ~$320,000 to train. PixArt takes only 12% of Stable Diffusion’s v1.5 training time, saving nearly $300,000
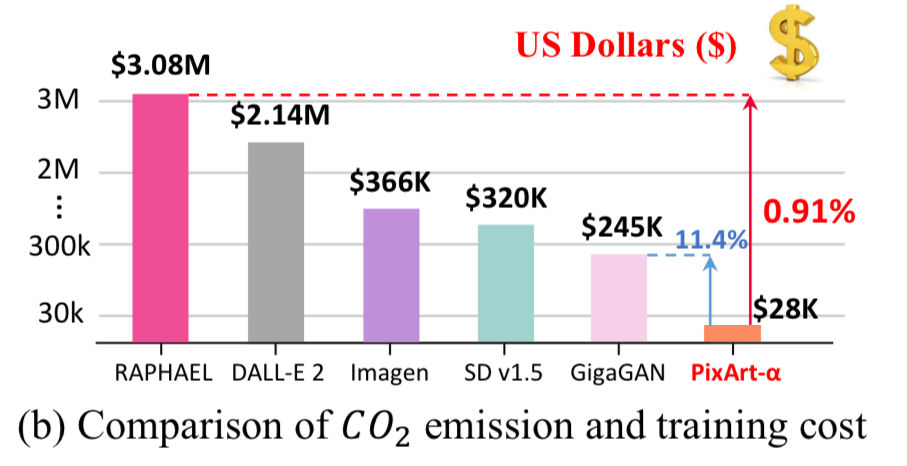
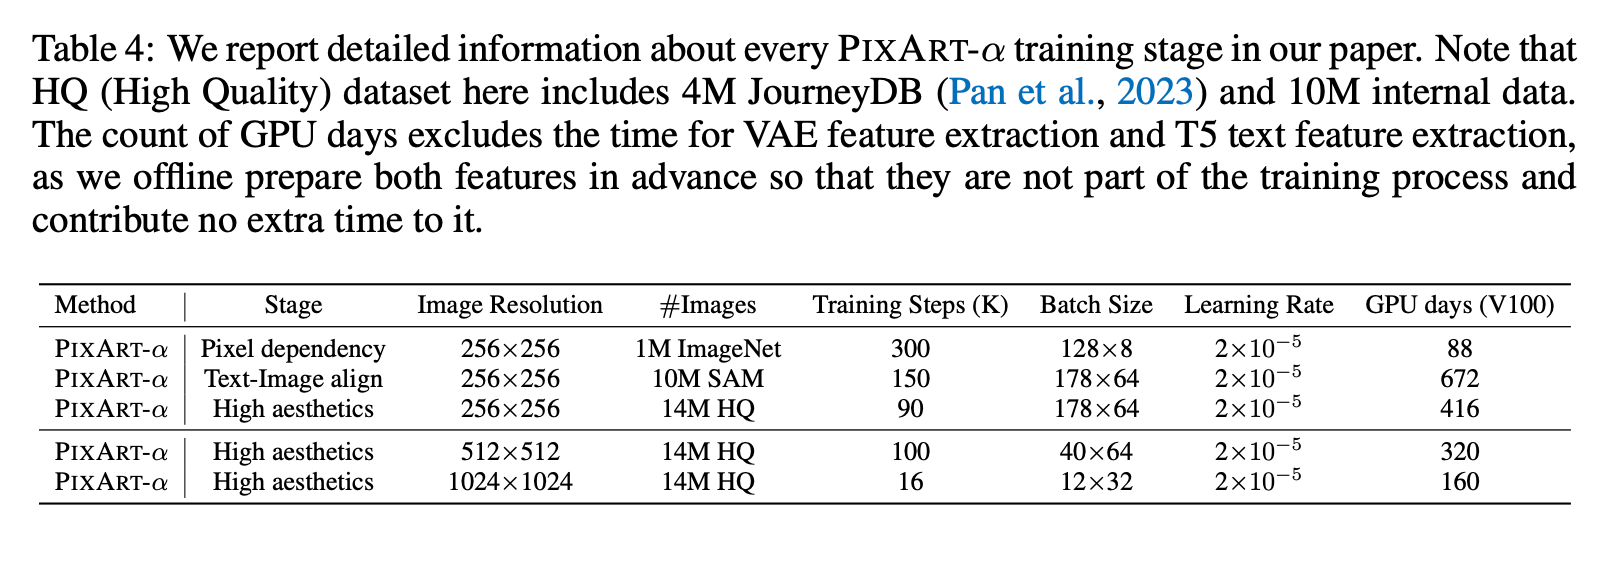
This is the equivalent of ~753 A100 GPU Days. Which we do not have to wait 2 years on, because can distribute the load onto a cluster of GPUs with libraries such as accelerate.
"Our final model is trained on 64 V100 for approximately 26 days."
While this is a huge improvement, I’m expecting most of you don’t have $28k laying around to train a model from scratch. Luckily they did all heavy lifting for us and open sourced the model weights and the code.
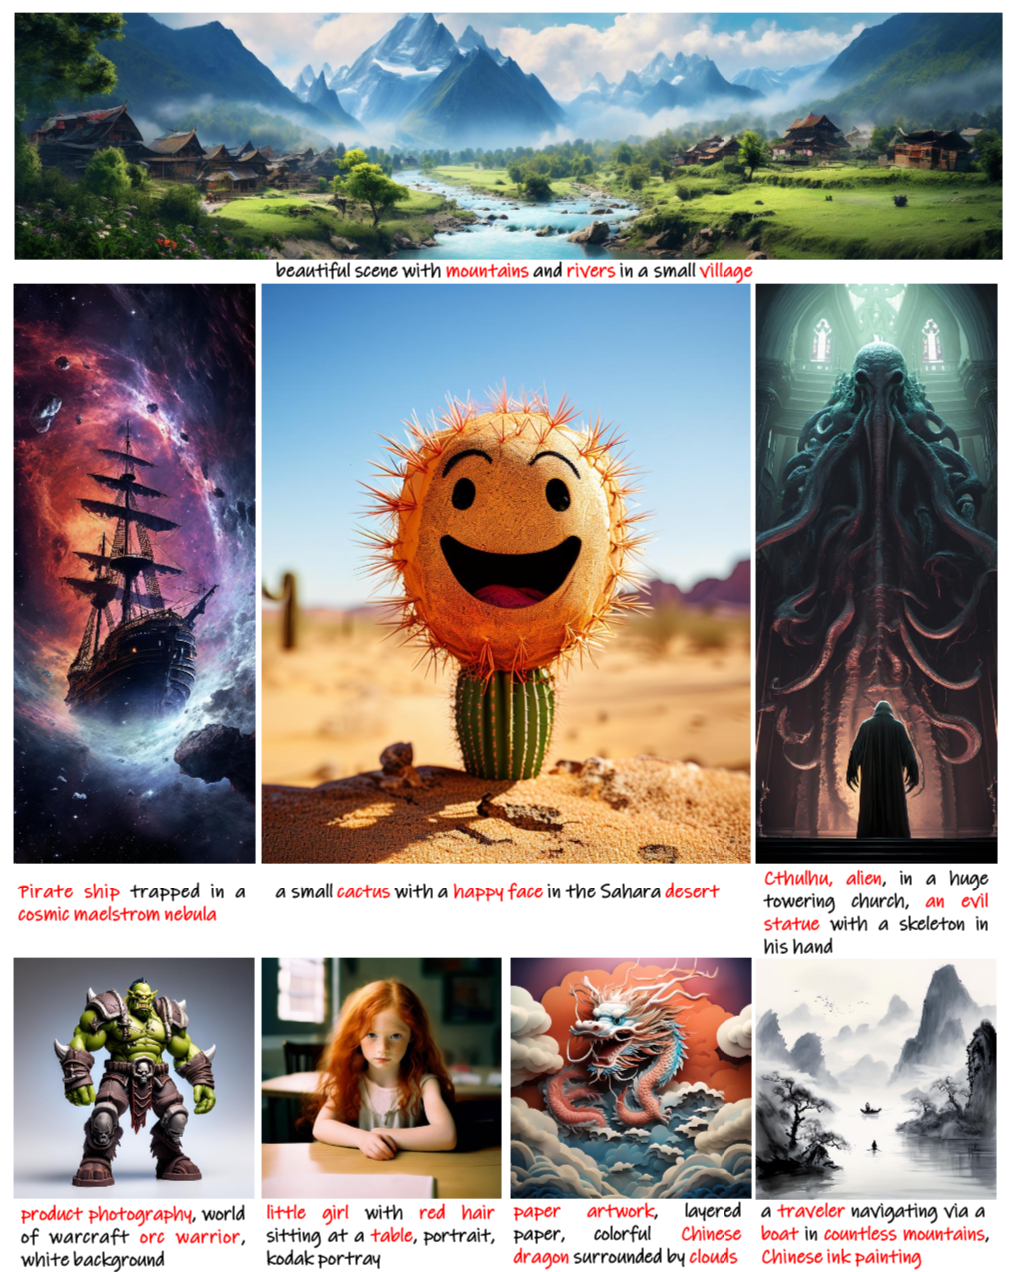
The top of the paper shows the quality of the images:
Why Fine-Tune?
The default output of text2image models can have a very specific style. I’m sure you notice Midjourney or Dalle styles right away.
PixArt makes it pretty accessible for anyone to inject their own style in and train their own models. Sure you could inject style with the prompt, but there are always artifacts from training.

a. b. c.
a. Beautiful lady, freckles, big smile, blue eyes, short ginger hair, dark makeup, wearing a floral blue vest top, soft light, dark grey background
vs
b. Image in lego city adventures style, beautiful lady, freckles, big smile, blue eyes, short ginger hair, dark makeup, wearing a floral blue vest top, soft light, dark grey background
vs
c. Fine-Tuned on Llava Re-Captioned Images of Legos
This only took a couple hundred images to fine tune. Imagine how high quality you could get if you had an actual content library.
Prompt engineering is always faster. But if fine tuning only takes a couple hours and $2 and you can shift the distribution that much, its exciting to imagine what kind of content will we will be able to create in a year or two.
(More images comparisons here: https://www.oxen.ai/ox/PixArtResults/file/main/legos.jsonl )
Core Model Architectures
This paper builds up the Diffusion Transformers (DiT) work as well as uses LLaVa to perform some Synthetic Data Generation. We have covered these topics in previous dives so won’t get into them too much and dive into the meat of it
Diffusion Transformers
https://www.oxen.ai/blog/arxiv-dives-diffusion-transformers
Llava
https://www.oxen.ai/blog/arxiv-dive-how-to-llava-works
PIXART-α Design Principles
In the PixArt have 3 core design principles:
- Decompose training steps
- pixel level distribution of natural images
- text-image alignment
- image aesthetics alignment
- An efficient transformer, where they incorporate cross-attention from the text encoder into the DiT as well as removing some MLPs and modifying the AdaLN layer to reduce parameter count
- Better Data. Synthetic data from LLaVa to re-caption images
Decomposing Training, 3 Steps
- Pixel Dependency Learning
They start with an ImageNet pre-trained DiT model, taking advantage of class-conditional image generation.
- Text-image alignment learning
The challenge then becomes transitioning from a pre-trained class-guided image gen model to a text-to-image model.
Single class label to a full sentence.
They modify the base DiT model by adding cross attention into each transformer block to inject textual information.
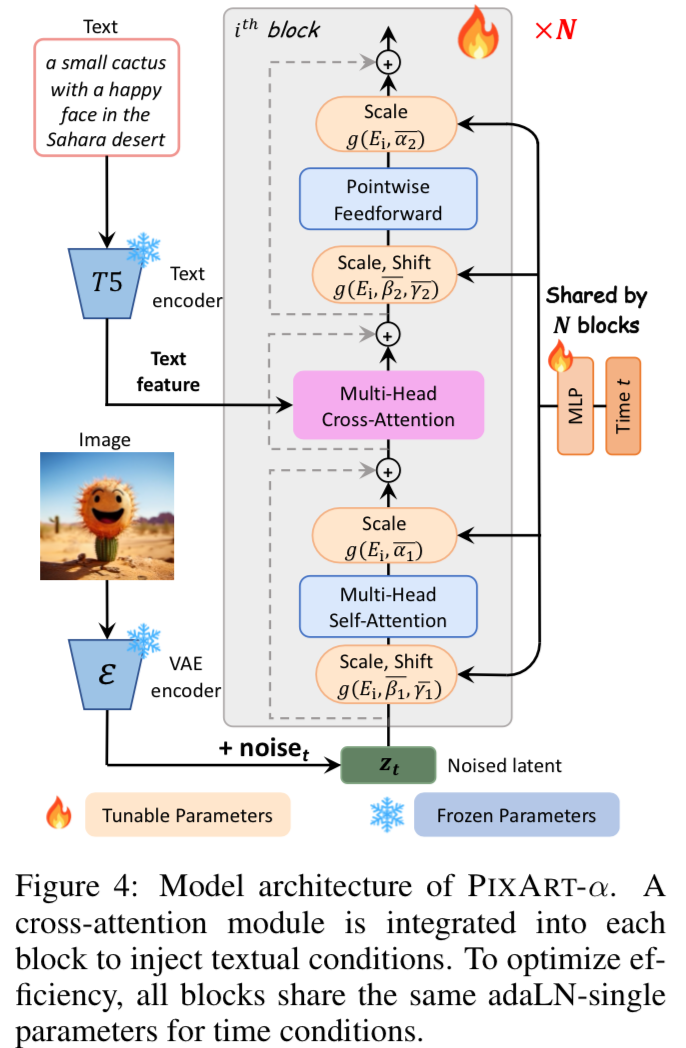
The language model used is a T5 text encoder (4.3B Flan-T5-XXL) then the DiT-XL/2 is their base image generation network architecture. They use a fixed length of 120 for the input text tokens.
"We find that the linear projections in the adaptive normalization layers module of the DiT account for a substantial proportion (27%) of the parameters. Such a large number of parameters is not useful since the class condition is not employed for our T2I model."
They also reduce the model’s size by incorporating a global MLP that takes in the time dimension (right side) and a single AdaLN layer. They say that this along with the cross attention with the text encoder allows you to reduce the model’s size while maintaining generative abilities.
- Image Aesthetics Alignment
Fine-tune the model using high-quality aesthetic data for high-resolution image gen. This process converges significantly faster than the pre-training step.
👨🍳 Data Quality is (almost always) The Secret Sauce
Synthetic data to improve data quality for the win (again) 🙌
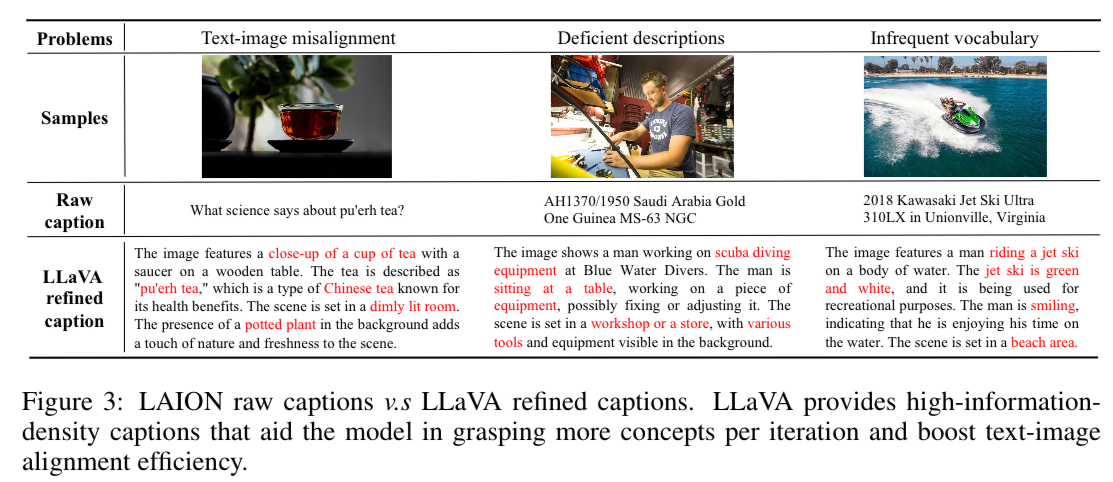
They call out that certain text2image dataset such as LAION have a variety of issues.
- text-image misalignment
- deficient descriptions
- infrequent diverse vocab usage
All they do to improve the quality is use LLaVA + the prompt
“Describe this image and it’s style in a very detailed manner”
Our prompt:
Give the caption of this image '{caption}', describe this image and its style in a very detailed manner,
They fix this with an auto-labeling pipeline to generate precise image captions.
🌋 LLaVA Recaptioning
We were amazed at captions from LLaVa:
https://www.oxen.ai/ox/simpsons-captions-with-llava/file/main/train.jsonl
They also note that LAION is not that great of a distribution of images. It is mainly product reviews from shopping websites. So instead they use the SAM dataset (Segment Anything from Meta) and run all these images through LLaVa.
They also incorporate JourneyDB into a 10M pair internal dataset.
At the end of the day this means the model was trained on a few datasets.
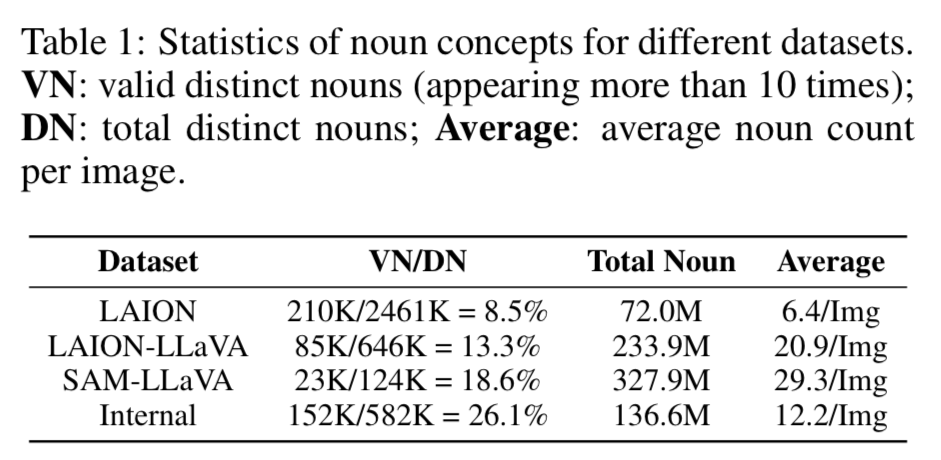
They then analyze the noun distribution between the datasets to show how they have more diverse concepts in theirs.
Valid distinct nouns those appearing more than 10 times in the dataset. You can think of this as the model “gets to see enough examples of this noun” of “improving the concept density”.
Given the parameter count and number of training images PixArt is very competitive
🤿 Let’s Dive into Fine-Tuning
To start, as an evaluation set, I added all the prompts from the back of the paper to an Oxen Repository and ran them through the base model.
Pretty great looking images!
Now let’s talk about the first two experiments we ran. Legos and Simpsons.
Here’s the OG training data for legos
https://www.oxen.ai/raulc/lego-city-adventures-captions
Let’s switch to VSCode and follow along here to show you how to do it yourself with an example dataset from scratch.
Training a Model
All the code to generate the data and train the model can be found here
You'll need to clone the proper datasets as well as the PixArt repository.
git clone https://github.com/PixArt-alpha/PixArt-alpha.gitoxen clone https://hub.oxen.ai/raulc/lego-city-adventures-captionsaccelerate launch --num_processes=1 --main_process_port=36667 PixArt-alpha/train_scripts/train_pixart_lora_hf.py --mixed_precision="bf16" \
--pretrained_model_name_or_path=PixArt-alpha/PixArt-XL-2-512x512 \
--train_data_dir=lego-city-adventures-captions/ \
--output_dir="legos-model" \
--caption_column="caption" \
--resolution=512 \
--train_batch_size=2 --gradient_accumulation_steps=1 \
--num_train_epochs=100 --checkpointing_steps=200 \
--checkpoints_total_limit=30 \
--learning_rate=3e-04 --lr_scheduler="cosine" --lr_warmup_steps=0 \
--seed=42 \
--report_to="tensorboard" \
--gradient_checkpointing \
--validation_epochs=5 \
--validation_prompt="Image in the style of lego city adventures, cute dragon creature" \
--rank=16 \
--adam_weight_decay=0.03 --adam_epsilon=1e-10 \
--dataloader_num_workers=8Final Thoughts
This is a ridiculously small subset of images to get these results. Imagine a movie studio using their own assets. How quickly they could iterate on story boards and bring concepts to life.
Next Up
Next up we are going to try to extend this work with a Control Net. By either using edge detection or human pose hopefully we can guide image generation with source images.
- Edges
- Human Pose
Raul’s Notes
Shout out to Raul from the Arxiv Dive community for doing the heavy lifting of getting this all working. He even got a pull request to the PixArt repo itself to get the LoRA fine tuning work (which was broken when we first started.)
The dataset is small so higher learning rate worked better.
With lower LR, their doc says lora rank 16 - it started working only when moved to 4 but higher LR worked generally better - end up using 3e-4, which works for 4, 8 and 16 Lora Rank (because the dataset is small) Blog post: Fine tuning of SDXL, Trainer UI kohya
https://github.com/bmaltais/kohya_ss/wiki/LoRA-training-parameters
Lora rank 4 = 3 million parameters, which makes it pretty fast
Time: 3 hrs 15 minutes
costs: local machine GPU used 230W, so for 15h it used about 3,5kwh, at 0.45c for 1kwh it costs 1,55EUR
also only 40-100 epochs and only like 400 samples were enough